In theory, yes. But maybe a step back is required.
I recall a plumber using some type of clamp to test the valve before installing the handle. What happens when you try turning on the water? If it seizes or is stuck, or somehow is reversed, maybe it's not purely an issue with the plastic piece. Any new one might snap as well due to the resistance from the valve inside that the plastic is not designed to sustain? It should turn relatively easily even without a handle.
EDIT: Now that I look at that pic, I had those shower handles. They were solid as F. But the plumber guy had to replace them when I got pressure values because they were not designed to be used with the pressure values he installed. Posi-temp adapters are a type of thermostatic or pressure valve.
Is this possibly a situation with an incompatible handle and valve? I don't recall if there was an extra piece inside, but they were hard enough that they shouldn't crack easily when turned. How much pressure did you use when turning? Shouldn't it turn easily?
In theory, yes. But maybe a step back is required.
I recall a plumber using some type of clamp to test the valve before installing the handle. What happens when you try turning on the water? If it seizes or is stuck, or somehow is reversed, maybe it's not purely an issue with the plastic piece. Any new one might snap as well due to the resistance from the valve inside that the plastic is not designed to sustain? It should turn relatively easily even without a handle.
EDIT: Now that I look at that pic, I had those shower handles. They were solid as F. But the plumber guy had to replace them when I got pressure values because they were not designed to be used with pressure values. Posi-temp adapters are a type of thermostatic or pressure valve.
Is this possibly a situation with an incompatible handle and valve? I don't recall if there was an extra piece inside, but they were hard enough that they shouldn't crack easily when turned. How much pressure did you use when turning? Shouldn't it turn easily?
Not much resistance when you turn it.
I did call a plumber to see if something was wrong with it. He turned it around and said everything worked fine just the handle was missing something and he would get it, but since he has gone MIA so I thought I would just search it out myself.
Doesn't seem like it should be this complicated but I guess it is and kind of frustrating.
Not much pressure used at all when turning it, it turns with no resistance but over time just snaps. The only issue being is that I can't screw it in tight because that's when I get the resistance.
The bottom plastic one is the one I am directly screwing into the cartridge but when I screw it all the way in it doesn't turn all the way and when loosened after a use the plastic snaps and breaks.
So I am assuming I need that black stem piece to attach and put the plastic knob after?
No no no, the black plastic piece is only if you have a lever handle. The knob type handle doesn't need it.
I've never seen one crack like that, but I've also never seen one with plastic that seems so thin... I guess the newer replacement parts are cheaper...
You have to have the recess in the knob lined up with the facets in the end of the stem. Maybe that's what snapped it.
Another possibilityand don't be embarrassed, I've done it beforeis that you have the cartridge installed upside down. That would be why "it doesn't turn all the way".
The Following 3 Users Say Thank You to timun For This Useful Post:
I did call a plumber to see if something was wrong with it. He turned it around and said everything worked fine just the handle was missing something and he would get it, but since he has gone MIA so I thought I would just search it out myself.
Doesn't seem like it should be this complicated but I guess it is and kind of frustrating.
Not much pressure used at all when turning it, it turns with no resistance but over time just snaps. The only issue being is that I can't screw it in tight because that's when I get the resistance.
Now that I think about it, mine didn't have the extender, but there certainly were plastic pieces inside when it was removed. I don't think you need the metal piece.
There's an $18 or $25 open box option. Again, I think the plastic bits are the pieces you're looking for, but you could also swap the handle to one that isn't acrylic if it matches what you currently have installed.
The Following User Says Thank You to DoubleF For This Useful Post:
No no no, the black plastic piece is only if you have a lever handle. The knob type handle doesn't need it.
I've never seen one crack like that, but I've also never seen one with plastic that seems so thin... I guess the newer replacement parts are cheaper...
You have to have the recess in the knob lined up with the facets in the end of the stem. Maybe that's what snapped it.
Another possibilityand don't be embarrassed, I've done it beforeis that you have the cartridge installed upside down. That would be why "it doesn't turn all the way".
I will double check that part.
I did not install the cartridge but that could be the case how do I check if its upside down lol.
Now that I think about it, mine didn't have the extender, but there certainly were plastic pieces inside when it was removed. I don't think you need the metal piece.
There's an $18 or $25 open box option. Again, I think the plastic bits are the pieces you're looking for, but you could also swap the handle to one that isn't acrylic if it matches what you currently have installed.
The first link is the one I have been getting but it didn't come with that extra piece.
Now I am confused why the plumber said it was missing the extra piece or adapter if its not needed for the plastic piece.
Seems like an unnecessary headache lol its just the handle.
The easiest way to check if it's upside down is to simply run the water. Given all you're missing at this point is the knob, you're perfectly safe to turn the water back on. If you (GENTLY) turn the cartridge stem clockwise and it's cold water coming out, you've got the cartridge upside down.
In that case you:
pull the metal sleeve out,
take the escutcheon plate back off,
pull the retainer pin out the top,
use the removal tool that should have come with the replacement cartridge or a pair of needlenose pliers to spin the valve 180°, then
put the pin back, put the escutcheon plate and sleeve back on
The Following User Says Thank You to timun For This Useful Post:
The easiest way to check if it's upside down is to simply run the water. Given all you're missing at this point is the knob, you're perfectly safe to turn the water back on. If you (GENTLY) turn the cartridge stem clockwise and it's cold water coming out, you've got the cartridge upside down.
In that case you:
pull the metal sleeve out,
take the escutcheon plate back off,
pull the retainer pin out the top,
use the removal tool that should have come with the replacement cartridge or a pair of needlenose pliers to spin the valve 180°, then
put the pin back, put the escutcheon plate and sleeve back on
Ran the test it is installed correctly warm water came out.
Joys of working form home lol.
Is this something I can replace with that other handle with the adapter instead of acrylic or do I need to change valves for that?
The one DoubleF posted I screw it in directly and snaps lol.
Is this something I can replace with that other handle with the adapter instead of acrylic or do I need to change valves for that?
The one DoubleF posted I screw it in directly and snaps lol.
Honestly the acrylic knob should just screw on and you're done. That it cracked liked that it very bizarre. As I wrote before, you have to make sure the facets cut into the stem line up with the hole in the back of the knob. Lined up correctly, there's no reason why it would crack apart like that. The little metal washer on the stem prevents the knob from going too far down the stem, and you don't need to reef on the screwdriver when tightening it.
This could also be a problem:
Quote:
Originally Posted by Wormius
Are you sure it’s a Moen handle? That seems pretty flimsy for one of theirs.
You sure you've got a genuine Moen handle that fits properly?
The Following User Says Thank You to timun For This Useful Post:
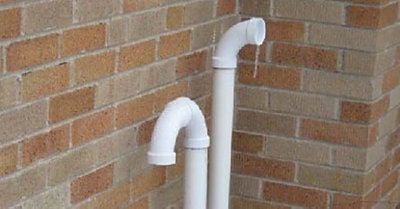
But my furnace exhaust looks something like this (the left one):
It blows air against my stucco and is starting to discolour (I assume) because of it. I can't turn it 90 degrees as it's solidly attached. Can I secure another 90 degree elbow to it so it faces down then facing out and have everything still work properly?
I matched it to the one that has a notch that sticks out. This one from Home depot in the images seem to have more design and thickness to it. I wonder if it's an imitation by some other company?
But if it's not an imitation... Here's the company spec sheet. Maybe it'll help a little?
But my furnace exhaust looks something like this (the left one):
It blows air against my stucco and is starting to discolour (I assume) because of it. I can't turn it 90 degrees as it's solidly attached. Can I secure another 90 degree elbow to it so it faces down then facing out and have everything still work properly?
The intake and exhaust need to have a minimum separation distance(you can probably google it), which is probably why it is turned that way. Maybe just attach a little deflector or shield to prevent the condensation hitting the house?
The Following User Says Thank You to Fuzz For This Useful Post:
Honestly the acrylic knob should just screw on and you're done. That it cracked liked that it very bizarre. As I wrote before, you have to make sure the facets cut into the stem line up with the hole in the back of the knob. Lined up correctly, there's no reason why it would crack apart like that. The little metal washer on the stem prevents the knob from going too far down the stem, and you don't need to reef on the screwdriver when tightening it.
This could also be a problem:
You sure you've got a genuine Moen handle that fits properly?
It is a Moen part yes.
I tried the acrylic I got on Saturday with your suggestion and the video Wormius posted when I screw it on all the way it moves very tight, but when I loosen it a bit it rotates all the way and around now.
I am just worried it will snap again in that video he posted that other handle another piece that clamped down on the stem.
Is it ok to leave the screw not super tightened like you said?
Really stupid question... but is it possible the screw that is being used to fasten the handle is incorrect and too long?
Is it possible to saw off a millimetre or two so that it's tight against the handle but not so deep that it refuses to turn?
That is how I am installing it. I might be extra cautious and nervous now because they broke before that I am noticing it being tight when its normal?
I appreciate yours and everyone's help with this.
The only way I can think of that inside acrylic breaking is that the handle is turning when the valve stem isn't. If they turn at the same pace and pressure, it's fine. But if the handle is turning faster than the stem, metal beats acrylic.
I assumed that when you screwed the screw too right, the stem is more difficult to turn while the handle turns. This flexes the plastic from the inside which is why it cracked and shattered. It seemed consistent when you said that the handled turned fine when the screw was looser.
The washer shown in timun's image might be able to accomplish the same thing of having the valve and handle turn at the same speed and pressure (if it is indeed missing). The handle should turn without a screw in it. The screw is only to keep it in place and not popping off at inopportune times.
If you have the washer installed, I'd personally use a grinder on the screw or saw off a small bit of the end based on what you've described. If you notice you have that washer and it's not installed, maybe it is indeed bottoming out, so perhaps try that before shortening the screw?


 That would be why "it doesn't turn all the way".