06-05-2018, 04:45 PM
|
#1
|
|
Acerbic Cyberbully
Join Date: Aug 2003
Location: back in Chilliwack
|
 Removing wall tile
We are presently doing kitchen renovations, and I have a small section of tile that we are removing and replacing with glass shelving. I have now removed the tile, and the wall looks like this:
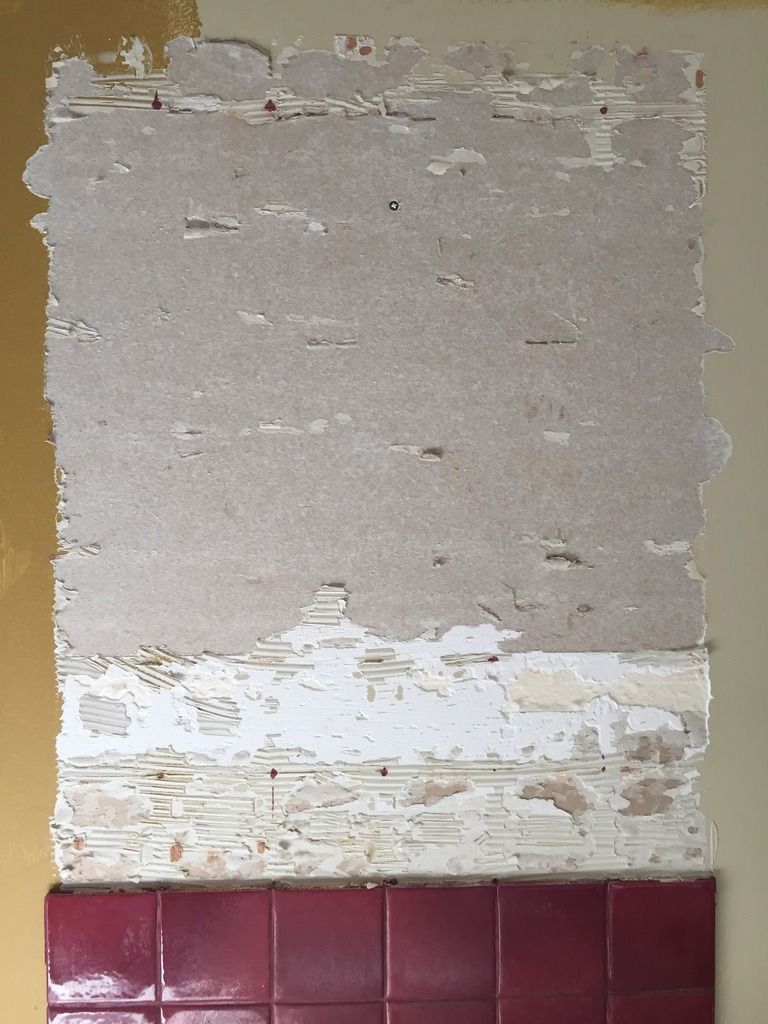
As you can see, there is still some remnants of tile adhesive, and much of the surface paper of the drywall has come away from the wall.
My question is, now what? I have done small wall patches in the past, but nothing this substantial. What steps do I need to take to repair the wall?
|

|

|
|
06-05-2018, 05:14 PM
|
#2
|
|
#1 Goaltender
|
Hopefully that wasn't the main support tile you removed...
|
|
|
|
|
The Following 10 Users Say Thank You to mikephoen For This Useful Post:
|
|
|
06-05-2018, 05:22 PM
|
#3
|
|
First Line Centre
Join Date: Apr 2009
Location: Behind Enemy Lines
|
I'm no Tim Taylor, but this is what I would do:
1) Scrape it down with a putty knife to remove protruding bits and loose bits
2) Apply drywall compound (mudding)
3) Smooth with sandpaper (150 grit?- correct me if wrong)
4) Repeat 2 & 3 if necessary
5) Paint
6) Install shelf
|
|
|
|
|
The Following 4 Users Say Thank You to krynski For This Useful Post:
|
|
|
06-05-2018, 05:34 PM
|
#4
|
|
Franchise Player
Join Date: Jul 2002
Location: Chicago
|
You might be better off to replace the drywall in that section. It's going to be hard to turn that into a smooth wall you will be happy with.
Otherwise, yeah. Smooth, fill, sand. Repeat.
|

|
|
|
The Following 3 Users Say Thank You to EldrickOnIce For This Useful Post:
|
|
|
06-05-2018, 05:42 PM
|
#5
|
|
Acerbic Cyberbully
Join Date: Aug 2003
Location: back in Chilliwack
|
Quote:
Originally Posted by EldrickOnIce

You might be better off to replace the drywall in that section. It's going to be hard to turn that into a smooth wall you will be happy with.
Otherwise, yeah. Smooth, fill, sand. Repeat.
|
Yeah, that is something I hoped I wouldnt have to do, but I think you are probably right.
|
|
|
|
|
06-05-2018, 05:42 PM
|
#6
|
|
Lifetime Suspension
|
That stuff might be water soluble spray a patch down to see if it softens.
|
|
|
|
|
The Following 2 Users Say Thank You to zamler For This Useful Post:
|
|
|
06-05-2018, 06:01 PM
|
#7
|
|
Franchise Player
Join Date: Oct 2006
Location: Calgary
|
Quote:
Originally Posted by Textcritic
Yeah, that is something I hoped I wouldnt have to do, but I think you are probably right.
|
That's what I'd do as well. It's a bit of a pain, but it'll be a better result at the end of it all.
__________________
Fireside Chat - The #1 Flames Fan Podcast - FiresideChat.ca
|
|
|
|
|
06-05-2018, 06:18 PM
|
#8
|
|
Franchise Player
|
If you do replace it, make sure to leave at least an inch of existing drywall above the red tile so you have some room to add tape and mud. If not it will be hard to fill the patch between the new drywall and old tile.
|
|
|
|
|
The Following 5 Users Say Thank You to OMG!WTF! For This Useful Post:
|
|
|
06-05-2018, 06:22 PM
|
#9
|
|
#1 Goaltender
Join Date: Apr 2009
Location: Back in Calgary!!
|
If you're good at drywall patches of that size cutting it out and replacing is probably the best bet.
But if you consider drywall the devil's product like I do, its kind of difficult to make the patch seamless. I have done patches like that quite a few times and its quite difficult to get seams to line up depth wise and all that. As well you will need to make sure you cut it out with access to studs sp that you can screw the new piece in. Then the taping and mudding is another adventure. All of the above is fine if you're covering it with different tile or something else, but because you're exposing it with shelving you want it to look good.
I wouldn't just scrape and mud the whole thing, because with all of the rough exposed paper, as soon as you sand the mud, you may hit some paper and then you're hooped.
What I would potentially consider is to scrape and gouge the #### out of that area getting a bit of depth into the gypsum. Then use a setting compound and apply it as you would drywall mud. Setting compound dries much harder than drywall mud and sands really well.
I have done this once in an area where I removed tile from unpainted drywall, so when I peeled the tile off it brought chunks of paper and gypsum with it. It took some patience and time, but I got it looking better than any of the cut out patches ive ever done.
*Disclaimer: Im the furthest thing from a professional.
Sent from my SM-G950W using Tapatalk
|
|
|
|
|
The Following User Says Thank You to sa226 For This Useful Post:
|
|
|
06-05-2018, 06:22 PM
|
#10
|
|
Acerbic Cyberbully
Join Date: Aug 2003
Location: back in Chilliwack
|
Quote:
Originally Posted by OMG!WTF!
If you do replace it, make sure to leave at least an inch of existing drywall above the red tile so you have some room to add tape and mud. If not it will be hard to fill the patch between the new drywall and old tile.
|
Ooooh. Good call, thanks!
|
|
|
|
|
06-05-2018, 10:02 PM
|
#11
|
|
Franchise Player
Join Date: Feb 2010
Location: Park Hyatt Tokyo
|
Get a bag of Synko Con-Fill. https://www.rona.ca/en/synko-concret...-15kg-05285007
Scrape down a 4 square at the top corner. Make clean cuts with a blade to the existing drywall so you dont have stray frayed paper poking out. Make sure anything within the square is a depression. Make sure a few inches of space around it are scraped smooth so youre clear when you trowel in the fill.
Mix a small amount of the con-fill in a mud tray. I think its 1/2 powder, half water. You want it pancake mix consistency. Fill the 4 square and use a trowel to smooth it flush.
Clean the trowel and the mud tray quickly. It sets up fast and will harden on tools and be more trouble to clean.
Let it dry. Use a drywall sanding block to sand it smooth and flush to the adjacent area. Apply a second coat if necessary. Sand smooth. You can also use a dap polyfiller at the very end to fill any small remaining dips.
Evaluate how it looks. Then...
Option one: do that to whole area and then put on a new drywall primer before painting.
Option two: tear out the drywall and hire someone.
|
|
|
|
|
The Following User Says Thank You to topfiverecords For This Useful Post:
|
|
|
06-07-2018, 10:11 AM
|
#12
|
|
First Line Centre
|
some good ideas in here. Because this installation is mostly cosmetic you can get away with a few things you couldn't in a wet environment like a shower.
I would probably just get rid of all the frayed paper, and mud over the area til its smooth, prime and tile.
If you replace the drywall, cut an inch inside the damaged area, use some scrap 2x4 to back the edges and add in a new piece. use mesh and con fill for your joints, it's stronger and you can get away with one pass since it's all going to be under the tile. Just make sure its smooth. You can use some mud on the edges for a finished look as you've got torn paper in the painted area.
You can buy small pieces of drywall at some building stores, costs more per sq ft but you don't have to take a whole sheet home.
|
|
|
|
|
06-07-2018, 10:32 AM
|
#13
|
|
Monster Storm
Join Date: Apr 2007
Location: Calgary
|
Quote:
Originally Posted by speede5
some good ideas in here. Because this installation is mostly cosmetic you can get away with a few things you couldn't in a wet environment like a shower.
I would probably just get rid of all the frayed paper, and mud over the area til its smooth, prime and tile.
If you replace the drywall, cut an inch inside the damaged area, use some scrap 2x4 to back the edges and add in a new piece. use mesh and con fill for your joints, it's stronger and you can get away with one pass since it's all going to be under the tile. Just make sure its smooth. You can use some mud on the edges for a finished look as you've got torn paper in the painted area.
You can buy small pieces of drywall at some building stores, costs more per sq ft but you don't have to take a whole sheet home.
|
This would be my advice as well. Also cut your patch first and then trace it on the wall. Cut your hole to the trace and blammo perfect fit
__________________
Shameless self promotion

|
|
|
|
|
The Following User Says Thank You to surferguy For This Useful Post:
|
|
|
06-07-2018, 11:13 AM
|
#14
|
|
Franchise Player
Join Date: Feb 2010
Location: Park Hyatt Tokyo
|
Quote:
Originally Posted by speede5
some good ideas in here. Because this installation is mostly cosmetic you can get away with a few things you couldn't in a wet environment like a shower.
I would probably just get rid of all the frayed paper, and mud over the area til its smooth, prime and tile.
If you replace the drywall, cut an inch inside the damaged area, use some scrap 2x4 to back the edges and add in a new piece. use mesh and con fill for your joints, it's stronger and you can get away with one pass since it's all going to be under the tile. Just make sure its smooth. You can use some mud on the edges for a finished look as you've got torn paper in the painted area.
You can buy small pieces of drywall at some building stores, costs more per sq ft but you don't have to take a whole sheet home.
|
He's putting up shelves not tile over the area.
|
|
|
|
|
06-07-2018, 11:34 AM
|
#15
|
|
First Line Centre
|
Quote:
Originally Posted by topfiverecords
He's putting up shelves not tile over the area.
|
Ahh. There was text above his picture. Thanks for clarifying. 
|
|
|
|
|
06-07-2018, 11:58 AM
|
#16
|
|
#1 Goaltender
Join Date: Sep 2005
Location: Calgary, AB
|
Skimmed over the posts, not sure if covered but this is what I would do:
-Scrape and sand entire wall
-Roll the wall with primer to seal it since there is exposed paper, very important
-Sand entire wall
-Skim coat with drywall compound, very wide blade, might take as many as 5 coats
|
|
|
|
 Posting Rules
|
You may not post new threads
You may not post replies
You may not post attachments
You may not edit your posts
HTML code is Off
|
|
|
All times are GMT -6. The time now is 07:49 PM.
|
|