07-31-2015, 12:01 PM
|
#501
|
|
Such a pretty girl!
Join Date: Jan 2004
Location: Calgary
|
Damn that looks nice. Interior brick walls are the shiznit.
__________________

|

|

|
|
08-03-2015, 01:36 PM
|
#502
|
|
First Line Centre
|
Electrical wiring Q:
The lights (normal, regular $0.89 lightbulb type fixture) in my hallway are currently controlled by two on/off switches: one switch is located right in next to the entry door, and one is further in the house, in the hallway. It is my understanding this is a three-way switch setup, and I read that three-way switches are used in pairs.
But I want to install a motion sensor switch on just one of those existing switch locations. If I use a motion sensor that specifically specifies it is a three-way switch, can I leave the other one as-is? Will the motion sensor still work regardless if the hallway switch is flicked up or down?
Or would it be ideal to just unhook the hallway switch all together and only put a single-pole motion sensor switch next to my door?
Or is there an option C here that I am not considering?
I went to Home Depot to seek an answer, but the guy didn’t really know, and certainly didn’t inspire me with confidence.
|
|
|
|
|
08-03-2015, 01:42 PM
|
#503
|
|
Franchise Player
Join Date: Jul 2002
Location: Chicago
|

Quote:
Originally Posted by Sr. Mints

Electrical wiring Q:
The lights (normal, regular $0.89 lightbulb type fixture) in my hallway are currently controlled by two on/off switches: one switch is located right in next to the entry door, and one is further in the house, in the hallway. It is my understanding this is a three-way switch setup, and I read that three-way switches are used in pairs.
But I want to install a motion sensor switch on just one of those existing switch locations. If I use a motion sensor that specifically specifies it is a three-way switch, can I leave the other one as-is? Will the motion sensor still work regardless if the hallway switch is flicked up or down?
Or would it be ideal to just unhook the hallway switch all together and only put a single-pole motion sensor switch next to my door?
Or is there an option C here that I am not considering?
I went to Home Depot to seek an answer, but the guy didnt really know, and certainly didnt inspire me with confidence.
|
You will need a 3 way motion sensing switch.
You will also need, iirc, to alter the wiring in the standard 3 way switch.
It should be easy enough to follow the instructions that come with new switch.
Use your phone and lots of pics before removing wires.. so you can easily put it back to where it was if you get lost.
Respect electricity and you will be good. Good luck!
|
|
|
|
|
The Following User Says Thank You to EldrickOnIce For This Useful Post:
|
|
|
08-03-2015, 03:41 PM
|
#504
|
|
Franchise Player
Join Date: Apr 2013
Location: Cowtown
|
Depends on how you want the switching to work, if you want it to work the same as the current set up, except with a motion 3 way switch, just replace the current 3 way with a motion 3 way. If you want to have the other switch as a "master" (where the lights will only turn on if the master switch is on) you can use a regular motion sensor and then a regular switch. Here's a couple diagrams to understand 3 way switching and "master" switching:
3 way
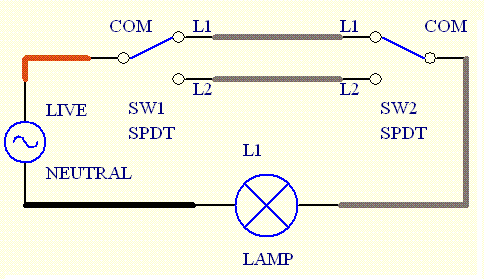
"Master" switch aka 2 switches in series
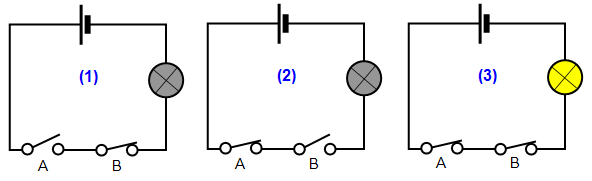
Don't worry about the power source in the 2nd photo being a battery. Same principle applies.
__________________
Quote:
Originally Posted by oilboimcdavid
Eakins wasn't a bad coach, the team just had 2 bad years, they should've been more patient.
|
|
|
|
|
|
The Following User Says Thank You to PaperBagger'14 For This Useful Post:
|
|
|
08-03-2015, 05:46 PM
|
#505
|
|
Scoring Winger
|
Quote:
Originally Posted by surferguy
Ive done this - let me know if you want details.

 |
Looks great. If you have the time to do a small write up on materials that you chose and reference materials you used to complete the work, that would be great.
|
|
|
|
|
The Following 5 Users Say Thank You to You Need a Thneed For This Useful Post:
|
|
|
08-06-2015, 06:31 AM
|
#507
|
|
Franchise Player
|
Looks fantastic! Up till 12:30 working on her, though, eh?
|
|
|
|
|
The Following User Says Thank You to Fuzz For This Useful Post:
|
|
|
08-06-2015, 07:21 AM
|
#508
|
|
Voted for Kodos
|
Way too many nights working until 12:30 or later.
|
|
|
|
|
08-06-2015, 09:48 AM
|
#509
|
|
Monster Storm
Join Date: Apr 2007
Location: Calgary
|
Quote:
Originally Posted by You Need a Thneed
Ok, more progress:
 |
Love it! The back splash is a nice subtle detail
__________________
Shameless self promotion

|
|
|
|
|
The Following 2 Users Say Thank You to surferguy For This Useful Post:
|
|
|
08-06-2015, 10:37 AM
|
#510
|
|
Voted for Kodos
|
Materials Listing:
Backsplash tile:
Tierra Sol - Novahex - Eggshell - Flat
Countertop:
Ceasarstone - Ice Snow
Cabinets Boxes:
Custom made from 3/4" maple melamine
Cabinet Drawers:
Custom made fingerjointed baltic birch plywood
Cabinet Fronts:
Solid Ash - stain: "Light Basalt" from Bellaire coatings
Sink:
Blanco Quatrus R15 U2 - Undermount
Faucet:
Delta Trinsic - Stainless Steel
Hinges:
Blum 110 degree soft close clip top hinges
Drawer Slides:
Accuride Full extension soft closing
What's not done yet will be done with Blum Tandem undermount slides (should have used these from the beginning)
Flooring:
(Not installed yet)
Congoleum - Duraceramic - Vista - Glacier - 12"x24" Vinyl Tile
Light Fixtures:
Kendall Lighting Line Voltage Rail kit
LG Fridge
Kenmore stove
Blomberg Dishwasher
Whirlpool OTR
|
|
|
|
|
08-06-2015, 07:39 PM
|
#511
|
|
Powerplay Quarterback
Join Date: Jan 2009
Location: Calgary
|
Quote:
Originally Posted by You Need a Thneed
Materials Listing:
Flooring:
(Not installed yet)
Congoleum - Duraceramic - Vista - Glacier - 12"x24" Vinyl Tile
|
I love the luxury Vinyl Tile I installed in our basement. It is so comfortable and easy on the feet, even with no underlay. Also turned out to be a really great choice with the major flooding we have had in the last two days.
Bloody infills. It's been an inconvenience for the last two years living next to that, and now they graded their yard and placed their downspout to drain right into our basement window. If anyone here is building an infill, keep your neighbours property in mind when planning on draining yours.
|
|
|
|
|
08-06-2015, 08:10 PM
|
#512
|
|
#1 Goaltender
|
Quote:
Originally Posted by Knalus
I love the luxury Vinyl Tile I installed in our basement. It is so comfortable and easy on the feet, even with no underlay. Also turned out to be a really great choice with the major flooding we have had in the last two days.
Bloody infills. It's been an inconvenience for the last two years living next to that, and now they graded their yard and placed their downspout to drain right into our basement window. If anyone here is building an infill, keep your neighbours property in mind when planning on draining yours.
|
You probably have a case for getting them to pay for your flood damage. I'm not a lawyer or bylaw expert but pretty sure you can't grade your yard or place downspouts in a way that moves water onto your neighbors property
|

|
|
|
08-07-2015, 02:18 PM
|
#513
|
|
Scoring Winger
Join Date: Mar 2003
Location: SW
|
I recently had my basement finished and am overall pleased with the work. One issue that I have noticed is that I got heated floors in the bathroom, but the heat does not extend to the toilet-- it seems to stop a couple of feet in front of the toilet-- so the floor is cold right where one would sit or stand to use the facilities.
I mentioned this to the contractor who talked to the tile guy and he said that this is standard to stay away from the toilet, but I'm not convinced this is right. Does anyone else out there with heated tile floors in the bathroom have their heat right up to where you would stand / sit at the toilet?
|
|
|
|
|
08-07-2015, 02:22 PM
|
#514
|
|
Scoring Winger
Join Date: Mar 2003
Location: SW
|
Quote:
Originally Posted by Knalus
I love the luxury Vinyl Tile I installed in our basement. It is so comfortable and easy on the feet, even with no underlay. Also turned out to be a really great choice with the major flooding we have had in the last two days.
Bloody infills. It's been an inconvenience for the last two years living next to that, and now they graded their yard and placed their downspout to drain right into our basement window. If anyone here is building an infill, keep your neighbours property in mind when planning on draining yours.
|
I'm in the same boat-- I live beside a new infill and the rain the other day came pouring off of the roof where their gutters appear to be warped and it was like a waterfall, draining onto my property and right into my window well of my newly finished basement. I was out there bailing water for an hour and a half trying to keep on top of it... My property used to be fine, but since that house has been there it's always wet.
|
|
|
|
|
08-07-2015, 02:56 PM
|
#515
|
|
Lifetime Suspension
Join Date: Sep 2011
Location: Calgary
|
Quote:
Originally Posted by Yellefan
I recently had my basement finished and am overall pleased with the work. One issue that I have noticed is that I got heated floors in the bathroom, but the heat does not extend to the toilet-- it seems to stop a couple of feet in front of the toilet-- so the floor is cold right where one would sit or stand to use the facilities.
I mentioned this to the contractor who talked to the tile guy and he said that this is standard to stay away from the toilet, but I'm not convinced this is right. Does anyone else out there with heated tile floors in the bathroom have their heat right up to where you would stand / sit at the toilet?
|
I can't say with any certainty, but I'm guessing it stems from the fact that you generally want to keep electricity away from water.
|
|
|
|
|
08-07-2015, 03:13 PM
|
#516
|
|
Franchise Player
Join Date: Apr 2013
Location: Cowtown
|
Quote:
Originally Posted by Yellefan
I recently had my basement finished and am overall pleased with the work. One issue that I have noticed is that I got heated floors in the bathroom, but the heat does not extend to the toilet-- it seems to stop a couple of feet in front of the toilet-- so the floor is cold right where one would sit or stand to use the facilities.
I mentioned this to the contractor who talked to the tile guy and he said that this is standard to stay away from the toilet, but I'm not convinced this is right. Does anyone else out there with heated tile floors in the bathroom have their heat right up to where you would stand / sit at the toilet?
|
Electric floor heating or is it plumbed in? Electrical code says outlets (I'm not sure if this extends to in floor heating resistors) must be further than 1m away from any water supply or drain with the exception of low voltage wires for automatic flushing.
__________________
Quote:
Originally Posted by oilboimcdavid
Eakins wasn't a bad coach, the team just had 2 bad years, they should've been more patient.
|
|
|
|
|
|
08-08-2015, 07:50 AM
|
#517
|
|
Monster Storm
Join Date: Apr 2007
Location: Calgary
|
Quote:
Originally Posted by Yellefan
I recently had my basement finished and am overall pleased with the work. One issue that I have noticed is that I got heated floors in the bathroom, but the heat does not extend to the toilet-- it seems to stop a couple of feet in front of the toilet-- so the floor is cold right where one would sit or stand to use the facilities.
I mentioned this to the contractor who talked to the tile guy and he said that this is standard to stay away from the toilet, but I'm not convinced this is right. Does anyone else out there with heated tile floors in the bathroom have their heat right up to where you would stand / sit at the toilet?
|
I just did some in floor heating in my bathroom and the installation videos specifically say not heat around/ under the toilets and vanities. I am not entirely sure why and somebody else may have a better answer but that is what I can contribute today.
__________________
Shameless self promotion
|
|
|
|
|
08-08-2015, 08:02 AM
|
#518
|
|
Monster Storm
Join Date: Apr 2007
Location: Calgary
|
Quote:
Originally Posted by morgin
Looks great. If you have the time to do a small write up on materials that you chose and reference materials you used to complete the work, that would be great.
|
Brick wall
In order to do a brick wall first you are gonna need bricks. In my case I had access to full sized left over bricks, so I spent a day cutting a 3/4" veneer off both sides to create my tile. Took a fair amount of time but I like the look of a real brick vs the veneers you can purchase ( or at least the ones I could find at the time, 7 yrs ago).
Given I went with a warehouse style brick stack I wasn't to concerned with it being " perfect". So I applied tile mortar to my drywall and started laying my bricks leaving enough space to apply my mortar (like grout) after.
I then returned to the project once the tile mortar was set and switched to a brick mortar to fill in the joints ( jointing). I mixed my mortar and used an industrial bakers bag to squeeze it into the joints. In my case I used a rubber glove to squish it in the last bit to fully fill the joint and a sponge to remove the excess to give it the final look.
I would also recommend electrical box extensions to be placed on existing receptacles to allow for the depth of the bricks. I think that covers it??
Hit me with more questions if you have them
__________________
Shameless self promotion
|
|
|
|
|
The Following 2 Users Say Thank You to surferguy For This Useful Post:
|
|
|
08-08-2015, 11:36 AM
|
#519
|
|
#1 Goaltender
|
Quote:
Originally Posted by surferguy
Brick wall
In order to do a brick wall first you are gonna need bricks. In my case I had access to full sized left over bricks, so I spent a day cutting a 3/4" veneer off both sides to create my tile. Took a fair amount of time but I like the look of a real brick vs the veneers you can purchase ( or at least the ones I could find at the time, 7 yrs ago).
Given I went with a warehouse style brick stack I wasn't to concerned with it being " perfect". So I applied tile mortar to my drywall and started laying my bricks leaving enough space to apply my mortar (like grout) after.
I then returned to the project once the tile mortar was set and switched to a brick mortar to fill in the joints ( jointing). I mixed my mortar and used an industrial bakers bag to squeeze it into the joints. In my case I used a rubber glove to squish it in the last bit to fully fill the joint and a sponge to remove the excess to give it the final look.
I would also recommend electrical box extensions to be placed on existing receptacles to allow for the depth of the bricks. I think that covers it??
Hit me with more questions if you have them
|
Can you update your house thread??
|
|
|
|
|
08-08-2015, 12:07 PM
|
#520
|
|
Monster Storm
Join Date: Apr 2007
Location: Calgary
|
Quote:
Originally Posted by woob
Can you update your house thread??
|
I will once I have finished with the vanity then I can do a full before/after of the bathroom.
__________________
Shameless self promotion
|
|
|
|
|
The Following User Says Thank You to surferguy For This Useful Post:
|
|
 Posting Rules
|
You may not post new threads
You may not post replies
You may not post attachments
You may not edit your posts
HTML code is Off
|
|
|
All times are GMT -6. The time now is 09:46 PM.
|
|